Node Authorization in k8s
I'm starting to get into the container world and I'm loving it. Recently we helped a client build out and deploy a micro-services application in Kubernetes. We created the cluster in Azure using the open source project acs-engine. After we got the cluster set up, our client asked for some updates to the cluster for security reasons. One of those updates was to enable Node Authorization.What is Node Authorization?
Node Authorization locks down each Node in the cluster to only be able to do actions on itself. If this is not turned on, its possible for a malicious pod to take actions on any other node, including reading secrets, deleting pods, etc. There is an excellent post by Antoine Cotten that explains this very well ( as well as RBAC, which is a different subject altogether).
How do I set it up?
Based on the current documentation, it looks like setting up Node Authorization should be easy. Basically follow these steps
- Turn on TLS Boot Strapping
- Edit the api-server yaml file
- Sit back and relax knowing your cluster is more secure
The trouble is that #1 takes you down a very deep rabbit hole of links starting here. The rest of this post will walk you through how I got it set up.
Turning on TLS Bootstrapping
The first step in enabling TLS bootstrapping is to create a token csv file on the master node and update the apiserver yaml file to use it.
Create Token file
- SSH into the master node
- change directory to /etc/kubernetes/
- run the following command to create a token string
- head -c 16 /dev/urandom | od -An -t x | tr -d ' '
- create a bootstrap.csv file
- touch bootstraptoken.csv
- edit the file
- vi bootstraptoken.csv
- Add the following text, substituting in your token created above
- [token],kubelet-bootstrap,10001,"system:bootstrappers"
- example: c0e89sdfasdfasdfff3b8718ab7868cc989,kubelet-bootstrap,10001,"system:bootstrappers"
Edit API Server
After the CSV file is created, we need to update the api server configuration to use it.
- Make sure you are still SSH'ed into the master
- edit the api server configuration at :/etc/kubernetes/manifests/kube-apiserver.yaml
- vi /etc/kubernetes/manifests/kube-apiserver.yaml
- Add "--token-auth-file=/etc/kubernetes/bootstraptoken.csv" to the commands

Great! Now your master node is set up to allow TLS bootstrapping. Next up is to get your agents set up.
Configure Agent Node
Note: the following instructions are to configure a single agent. You will need to do this for each agent in your cluster.
- SSH to the Agent node.
- Typically this is done by SSH'ing to the master, uploading your private key to the master and then SSH'ing into the master.
Edit kubeConfig file
We need to edit the create a kubeconfig file that uses the token string created above.
- Change directory to /var/lib/kublet
- cd /var/lib/kubelet
- Create a bootstrap.kubeconfig file
- touch bootstrap.kubeconfig
- Edit the bootstrap.kubeconfig file with the following text, substituting in the IP address of the master node and the token string created above
- apiVersion: v1
kind: Config
clusters:
- name: localcluster
cluster:
certificate-authority: /etc/kubernetes/certs/ca.crt
server: https://MASTERNODEIP:443
users:
- name: kubelet-bootstrap
user:
token: TOKENSTRING
contexts:
- context:
cluster: localcluster
user: kubelet-bootstrap
name: localclustercontext
current-context: localclustercontext
Edit Kublet
The next step is to edit the Kublet configuration to point to the bootstrap.kubeconfig file created directly above
- Change Directory to /etc/systemd/system
- Edit kubelet.service
- Add the following to the startup section, making sure to include the forward slash

Restart Kubelet
After those edits, let's restart the Kubelet to make sure that it picks up the latest changes. Run the following commands:
systemctl stop kubelet
docker kill $(docker ps -q)
systemctl start kubelet
Validate it's working
Now that the master and agents are updated, lets make sure its working
- run "kubectl get nodes"
- the node you just updated should say "NotReady". This is because we have not approved the CSR for the node. Lets do that now
- run "kubectl get csr"
- this will show the CSR's that have been submitted. You should see one in a pending state for the node was just set up

- run "kubectl describe certificate
" to review the request. The Common Name should be "System:nodes: - Run "kubectl get nodes" again. This time the node should be back to "Ready" state


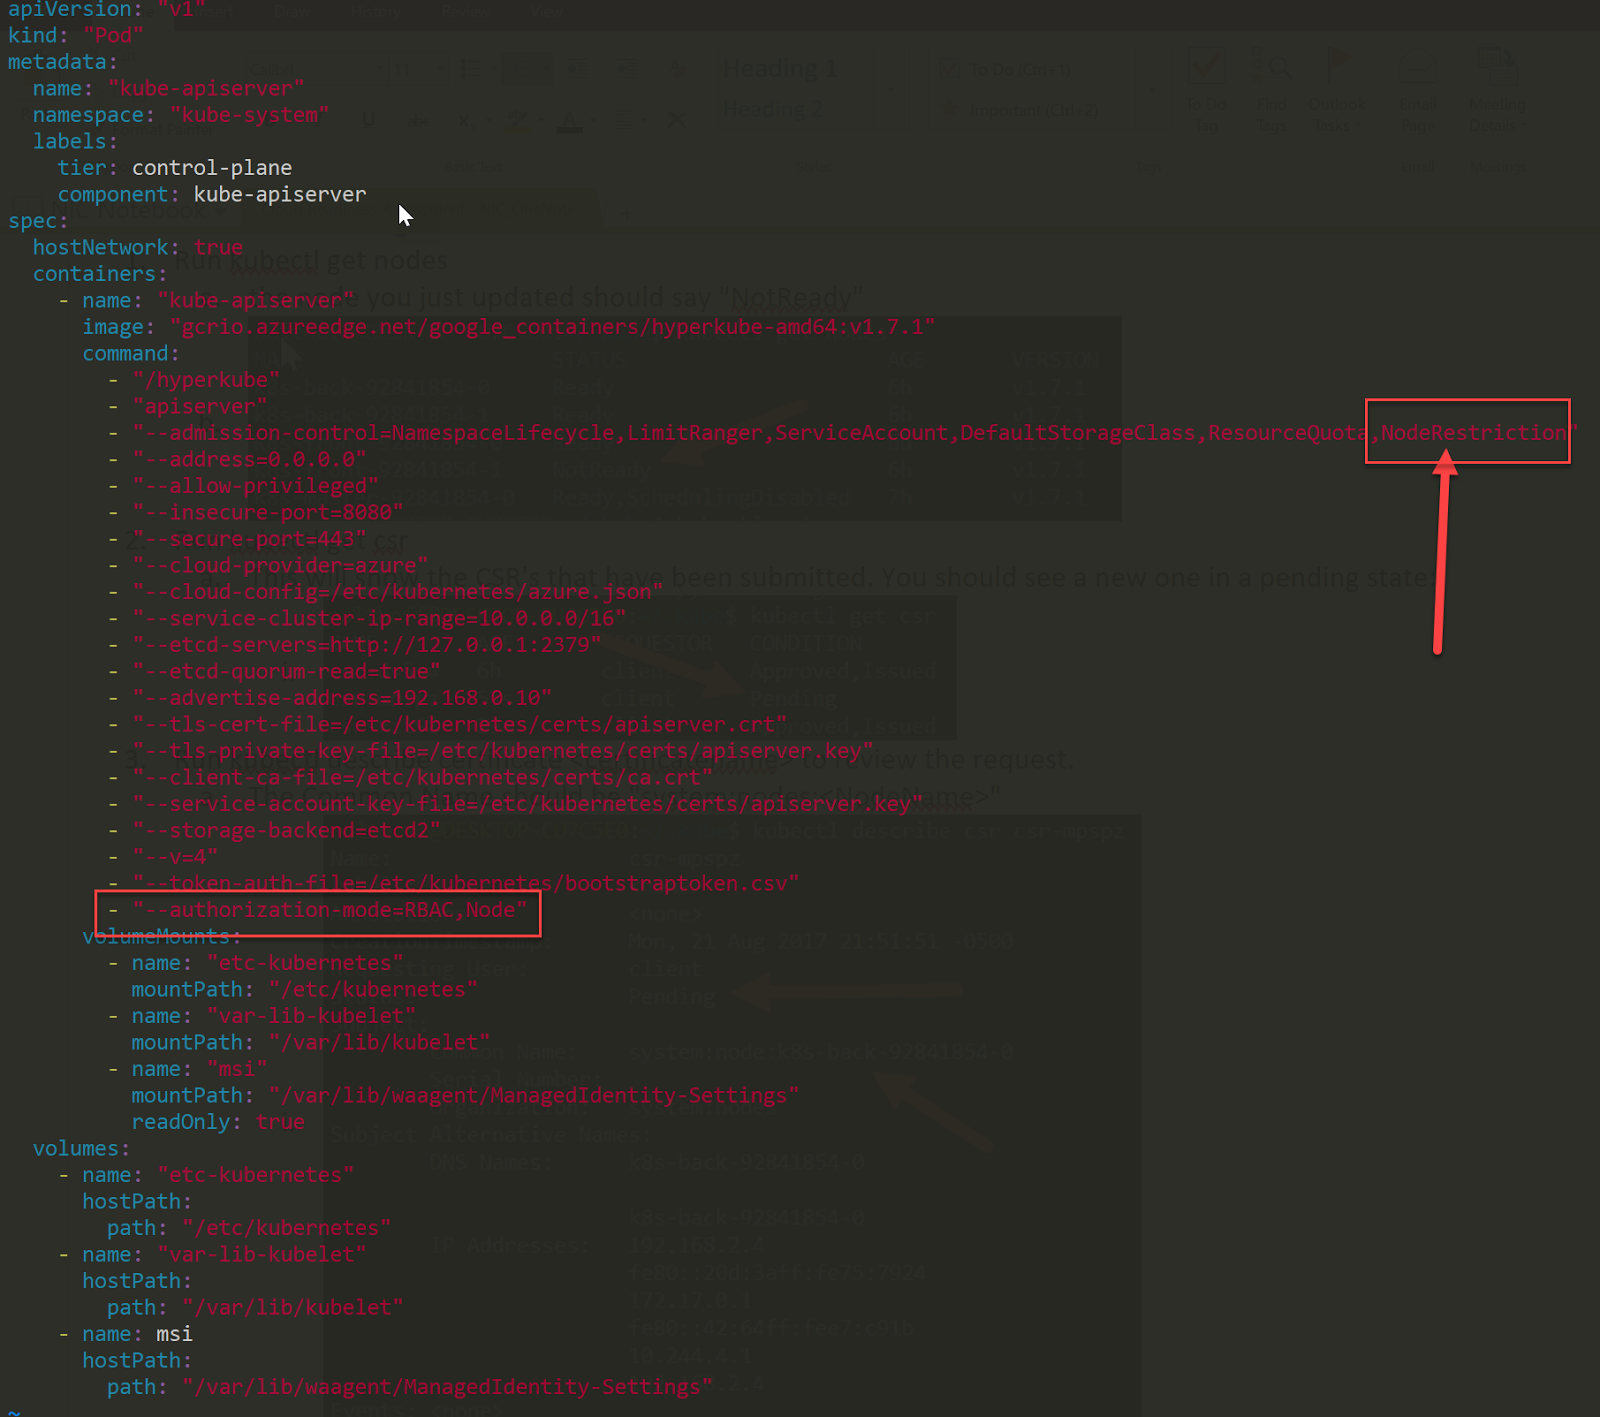
Edit API Server (again)
Now TLS Bootstrapping is set up, but NodeAuthorization isn't enabled yet. In order to do that, we need to go back to the master and edit the api server.
Notes:
- Don't do these steps as part of editing the masters above as your cluster will become unstable since the API server will expect the agents to be configured with TLS Bootstrapping.
- While the documentation on NodeAuthorization doesn't mention needing RBAC enabled, i was unable to schedule pods on nodes until I turned it on. There is most likely some reliance on it, or an additional configuration I missed. However enabling RBAC is probably a good idea from a security standpoint anyway.
- SSH Into the Master
- Change directory to /etc/kubernetes/manifests
- edit kube-apiserver.yaml and add the following commands:
- "--authorization-mode=RBAC,Node"
- Add "NodeRestriction" to the existing admission-control command
- example:
- Restart all docker images on the master
- docker kill $(docker ps -q)
Summary
In summary, the steps above aren't daunting and but aren't easy to figure out from the docs. Adding this capability into acs-engine wouldn't be too difficult, even if you just customized it for your own cluster.
A big thanks to Lachie Evenson for helping me get this running. He's got some great videos around Kubernetes that I've found very useful.
Hopefully this saves someone an hour (or day) or two. Enjoy!
Thank a lot for this post that was very interesting. Keep posting like those amazing posts, this is really awesome :) Thank you for sharing any good knowledge and thanks for fantastic efforts.
ReplyDeleteReally the post is very unique.every concepts are captured nice.
oracle training in chennai
oracle training institute in chennai
oracle training in bangalore
oracle training in hyderabad
oracle training
oracle online training
hadoop training in chennai
hadoop training in bangalore